There is nothing quite like the aroma of freshly baked bread wafting through the kitchen. This recipe yields a classic, soft-textured white loaf with a beautiful golden crust, perfect for everything from morning toast to hearty afternoon sandwiches. By using simple pantry staples, you can bypass store-bought preservatives and enjoy the incomparable flavor of a warm, buttery slice straight from the oven.
Meta Description: Master the art of baking at home with this easy step-by-step white bread recipe. Create two soft, golden loaves using simple ingredients and foolproof techniques.
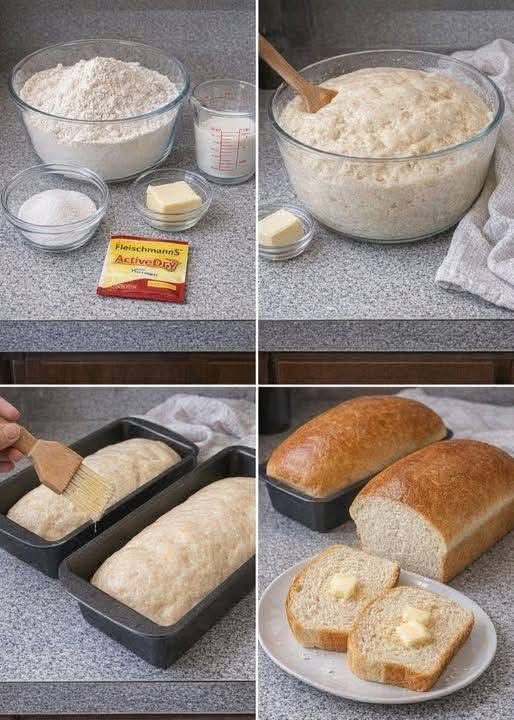
Ingredients
- All-Purpose Flour: 6 to 7 cups (plus extra for kneading)
- Active Dry Yeast: 1 packet (approx. 2 ¼ teaspoons)
- Warm Water or Milk: 2 cups (approx. 43°C – 46°C)
- Sugar: 3 tablespoons (to feed the yeast and add flavor)
- Butter: 3 tablespoons, softened
- Salt: 2 teaspoons
- Optional: 1 egg (for an egg wash to create a shiny crust)
Instructions
- Activate the Yeast: In a large mixing bowl, combine the warm liquid and sugar. Sprinkle the active dry yeast over the top. Let it sit for about 5–10 minutes until it becomes foamy.
- Mix the Dough: Add the softened butter, salt, and 3 cups of flour. Stir until a smooth batter forms. Gradually add the remaining flour, one cup at a time, until the dough pulls away from the sides of the bowl.
- Knead: Turn the dough onto a floured surface. Knead for 8–10 minutes until the dough is smooth, elastic, and no longer sticky.
- First Rise: Place the dough in a lightly greased bowl. Cover with a damp cloth or plastic wrap and leave in a warm, draft-free spot until doubled in size (usually 1 to 1.5 hours).
- Shape the Loaves: Gently punch down the dough to release air. Divide it into two equal portions. Roll each portion into a rectangle and then roll it up tightly into a loaf shape. Place into two greased 9×5 inch loaf pans.
- Second Rise: Cover the pans and let the dough rise again until it has risen about an inch above the rim of the pans (about 30–45 minutes).
- Bake: Preheat your oven to 190°C. Brush the tops with melted butter or an egg wash if desired. Bake for 30–35 minutes, or until the tops are deep golden brown and the loaves sound hollow when tapped on the bottom.
- Cool: Remove from pans immediately and let cool on a wire rack to prevent the crust from becoming soggy.
Service Suggestions
- The Classic: Serve warm slices with a generous pat of salted butter and honey.
- French Toast: Use thick slices the next day for a decadent breakfast.
- Gourmet Sandwiches: Perfect for a classic BLT or a grilled cheese with sharp cheddar.
Storage Tips
- Room Temperature: Keep in a bread box or an airtight bag for up to 3–4 days.
- Freezing: This bread freezes beautifully. Wrap the cooled loaf tightly in plastic wrap and then foil; it will stay fresh for up to 3 months.
FAQs
- Why didn’t my bread rise? Your water might have been too hot (killing the yeast) or too cold (not activating it). Also, check the expiration date on your yeast packet.
- Can I use bread flour instead? Yes! Bread flour has higher protein, which will result in a slightly chewier, taller loaf.
- How do I get a softer crust? Brush the top of the loaf with melted butter immediately after taking it out of the oven.
Conclusion
Baking your own bread is a rewarding process that turns basic ingredients into a staple of comfort food. While it requires a bit of patience for the rising stages, the result—a soft, fluffy interior with a crisp, golden exterior—is well worth the wait. Once you’ve tasted a slice of this homemade loaf, you may never go back to the grocery store aisle again.