Meta Description: Learn how to make DIY Aloe Vera oil at home to stimulate hair growth, reduce hair fall, and achieve a healthy scalp. Follow our simple step-by-step guide!
Introduction
If you are tired of dealing with thinning hair or a stubborn scalp that refuses to let your hair grow past a certain length, the solution might be sitting right in your garden. Aloe Vera is a powerhouse of over 75 nutrients, including vitamins A, C, and E, which contribute to cell turnover and healthy hair follicles.
Infusing Aloe Vera into a carrier oil allows you to penetrate the hair shaft more deeply than the gel alone. This DIY Aloe Vera oil is a cost-effective, natural alternative to expensive store-bought treatments, designed to strengthen your strands from root to tip.
Ingredients
To create this potent hair growth oil, you will need:
- 1 large Aloe Vera leaf: Fresh is best to ensure all active enzymes are present.
- 1 cup Carrier Oil: Coconut oil is excellent for deep penetration, while Olive oil or Jojoba oil works best for those with drier hair.
- Optional: 5-10 drops of Rosemary or Peppermint essential oil (both are clinically proven to aid hair growth).
- Optional: 2 Vitamin E capsules (acts as a natural preservative and adds extra shine).
Instructions (Step-by-Step)
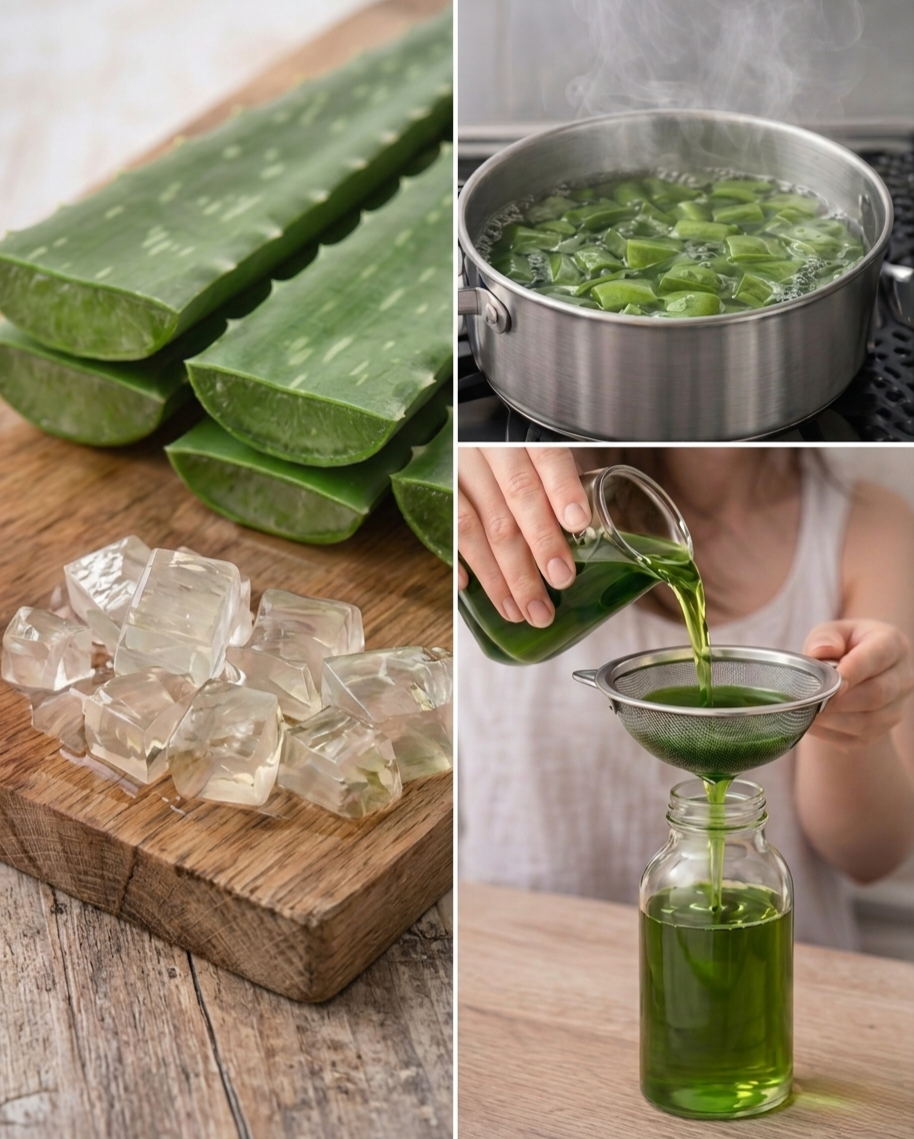
- Prepare the Aloe: Wash the Aloe Vera leaf thoroughly. Cut off the spiked edges and slice the leaf into small, even cubes (as seen in the image). You do not need to peel the skin, as it contains beneficial minerals.
- Combine with Oil: Place the Aloe cubes into a heavy-bottomed pot and pour in your chosen carrier oil until the Aloe pieces are fully submerged.
- Simmer Gently: Place the pot on the stove over low heat. It is crucial not to boil the oil, as high heat can destroy the beneficial properties of the Aloe. Simmer for about 30–45 minutes. The Aloe pieces will eventually turn brown or translucent, and the oil will take on a greenish tint.
- Cool and Strain: Turn off the heat and let the mixture cool completely. Use a fine-mesh strainer or a cheesecloth to strain the oil into a clean glass bowl, discarding the fried Aloe solids.
- Fortify (Optional): This is the time to stir in your essential oils or prick the Vitamin E capsules and squeeze the oil into the mixture.
- Bottle It: Pour the finished green oil into a clean glass jar or a dropper bottle for easy application.
Service Suggestions
- Pre-Wash Treatment: Massage the oil into your scalp and hair 30 minutes before showering.
- Overnight Mask: For deep conditioning, apply the oil at night, wrap your hair in a silk scarf, and wash it out in the morning.
- Scalp Massage: Use a small amount on your fingertips to perform a 5-minute scalp massage daily to boost blood circulation.
Storage Tips
- Keep it Cool: Store the oil in a cool, dark place. Direct sunlight can cause the oil to go rancid more quickly.
- Shelf Life: Without preservatives, this oil usually stays fresh for 2 to 3 weeks. Adding Vitamin E oil can extend this to about 2 months.
- Check for Freshness: If the oil develops a sour smell or changes color significantly, discard it and make a fresh batch.
FAQs
Q: How often should I use Aloe Vera oil?
A: For the best results, use it 2–3 times a week. Consistency is key when it comes to hair growth.
Q: Can I use bottled Aloe Vera gel instead?
A: It is not recommended for this specific heating method. Bottled gels contain thickeners and preservatives that don’t react well to being simmered in oil. Fresh leaf is the gold standard.
Q: Does it work for all hair types?
A: Yes! However, if you have very fine hair, focus the oil on your scalp and ends rather than the mid-lengths to avoid weighing it down.
Conclusion
Making your own Aloe Vera oil is a rewarding ritual that puts you in control of what goes onto your scalp. By bypassing harsh chemicals and synthetic fragrances, you’re giving your hair the pure nourishment it needs to thrive. With regular use, you’ll likely notice less shedding, a calmer scalp, and a noticeable boost in shine and length. Happy brewing!