
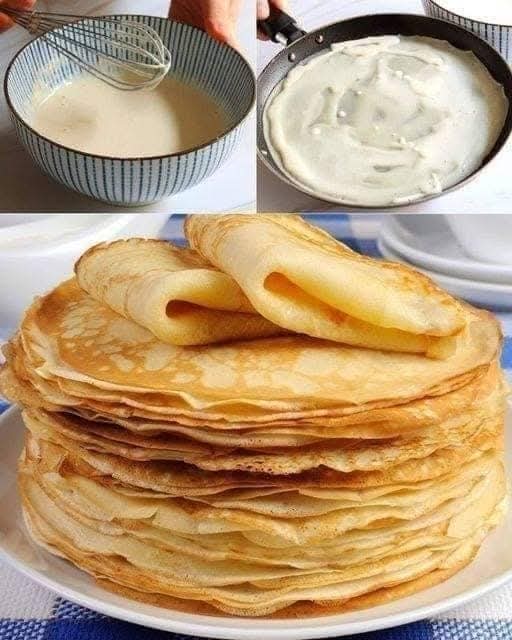
Meta Description
Learn how to make light, golden, and delicate classic French crepes from scratch with this easy step-by-step recipe, complete with serving ideas and storage tips.
Introduction
There is nothing quite like the comforting aroma of freshly cooked crepes wafting through the kitchen. Thin, delicate, and wonderfully versatile, these French-style crepes can be dressed up with sweet toppings like chocolate spread, fresh fruits, and jam, or kept savory for a hearty meal. Whether you are hosting a weekend brunch or craving a quick dessert, this easy recipe guarantees golden, restaurant-quality results every single time.
Ingredients
- All-purpose flour: 1.5 cups (180g)
- Granulated sugar: 2 tablespoons (optional, for a slightly sweet touch)
- Salt: 1/4 teaspoon
- Milk: 1.5 cups (360ml), at room temperature
- Water: 1/2 cup (120ml)
- Eggs: 3 large eggs, lightly beaten
- Unsalted butter: 3 tablespoons, melted (plus extra for greasing the pan)
- Vanilla extract: 1 teaspoon (optional)
Instructions (Step by Step)
- Mix the Dry Ingredients: In a large mixing bowl, whisk together the all-purpose flour, sugar, and salt until well combined.
- Combine Wet Ingredients: In a separate medium bowl, whisk together the milk, water, eggs, melted butter, and vanilla extract until smooth.
- Form the Batter: Gradually pour the wet ingredients into the dry ingredients while whisking constantly to prevent lumps. Whisk until the batter is completely smooth and liquid.
- Rest the Batter: Cover the bowl with plastic wrap and let it rest at room temperature for at least 30 minutes. (This relaxes the gluten and ensures tender crepes).
- Heat the Pan: Heat a non-stick skillet or crepe pan over medium heat and lightly coat it with a small amount of melted butter or oil.
- Pour and Swirl: Pour about 1/4 cup of batter into the center of the hot pan, immediately tilting and swirling the pan in a circular motion to coat the bottom evenly with a thin layer of batter.
- Cook the Crepe: Cook for about 1 to 2 minutes until the edges start to lift and turn lightly golden, and the bottom is golden brown.
- Flip and Finish: Gently loosen the edges with a spatula, flip the crepe over, and cook for another 30 seconds to 1 minute on the other side. Transfer to a warm plate and repeat with the remaining batter.
Service Suggestions
- Sweet Classic: Dust with powdered sugar and a squeeze of fresh lemon juice, or spread with Nutella, caramel, or fruit preserves and fold into triangles.
- Fresh Fruit: Top with sliced bananas, fresh strawberries, raspberries, and a dollop of whipped cream or vanilla ice cream.
- Savory Option: Skip the sugar in the batter and fill the crepes with sautéed mushrooms, spinach, ham, and melted cheese for a delightful lunch or dinner.
Storage Tips
- Refrigerator: Stack cooled crepes between layers of parchment paper, wrap tightly in plastic wrap or place in an airtight container, and store in the fridge for up to 3 days.
- Freezer: Freeze layered crepes between sheets of parchment paper inside a heavy-duty freezer bag for up to 2 months. Thaw overnight in the refrigerator before reheating.
- Reheating: Warm individual crepes in a skillet over low heat for a few seconds per side, or microwave them briefly until warm.
FAQs
Q: Why are my crepes turning out thick like pancakes? A: Your batter may be too thick or you are pouring too much batter into the pan at once. The batter should have the consistency of heavy cream or a very runny custard. Feel free to stir in a tablespoon or two of water or milk to thin it out.
Q: Can I make the crepe batter ahead of time? A: Yes! You can prepare the batter up to 24 hours in advance and store it covered in the refrigerator. Just give it a good whisk before using.
Q: Why did my first crepe tear or stick to the pan? A: The first crepe is often a test run! It usually happens if the pan isn’t hot enough, the pan lacked enough butter, or the batter was poured too thin. Make sure your non-stick pan is properly heated and lightly greased between batches.
Conclusion
Making homemade crepes is a simple culinary art that is well worth mastering. With their melt-in-your-mouth texture and endless customization options, they are sure to become a favorite treat for family and friends alike. Enjoy experimenting with your favorite fillings!