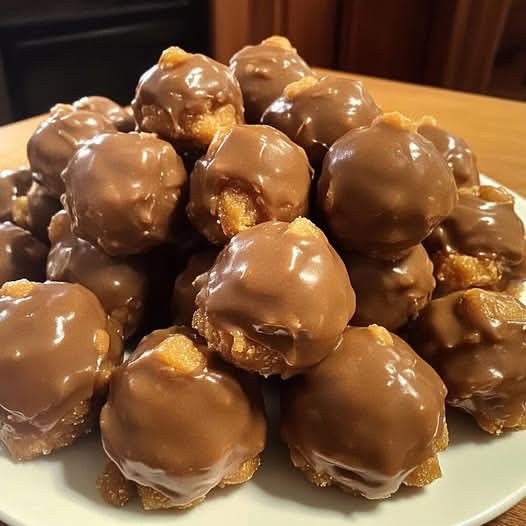
Butterfinger Balls Recipe: The Ultimate No-Bake Peanut Butter-Chocolate Treat
Indulge in the irresistible charm of homemade Butterfinger Balls, where creamy peanut butter, crushed Butterfinger candy bars, and smooth chocolate unite for a no-bake dessert that’s pure candy shop magic. These rich, bite-sized treats are the perfect fusion of a peanut butter cup’s creaminess and a Butterfinger bar’s crunchy sweetness. With only a few pantry ingredients and zero baking required, this is your ticket to effortless holiday joy and instant dessert satisfaction. Whether you’re making edible gifts, prepping for Christmas cookie trays, or just craving a late-night sweet fix, these no-bake Butterfinger Balls promise a perfect balance of creamy, crunchy, and chocolatey bliss.
Why You’ll Love This Recipe
This isn’t your average dessert ball—it’s indulgence redefined. The combination of velvety peanut butter centers and crisp chocolate coating gives each bite a satisfying contrast of textures. With no oven time and only about 10 minutes of hands-on prep, these treats are ideal for busy holidays, gifting, or quick dessert cravings. They’re kid-approved, adult-adored, and practically irresistible straight from the fridge.
Perfect for:
• Holiday dessert trays and Christmas parties
• Quick homemade gifts and edible favors
• Make-ahead treats for freezer storage
• Fans of Reese’s, Snickers, or any peanut butter-chocolate combo
Ingredients
For the Peanut Butter-Candy Centers
- 4 tbsp (½ stick / 56g) unsalted butter, softened
- 1 cup (250g) creamy peanut butter (Jif or Skippy recommended; avoid natural)
- 1 tsp pure vanilla extract
- 1 cup (120g) powdered sugar, sifted
- ¾ cup (75g) graham cracker crumbs (about 8 full crackers)
- ½ cup (60g) crushed Butterfinger bars, plus extra for garnish
For the Chocolate Coating
- 8 oz (225g) semi-sweet chocolate chips or melting wafers
- Optional: ½ tsp coconut oil (adds shine and smooth texture)
Optional Garnishes
- Extra crushed Butterfinger bars
- Festive sprinkles
- A pinch of flaky sea salt per ball
Step-by-Step Instructions
Step 1: Make the Dough
In a large mixing bowl, beat the softened butter and peanut butter together using a hand or stand mixer on medium speed for about 2 minutes until smooth. Add vanilla extract. Gradually mix in powdered sugar, ¼ cup at a time, until fully combined and creamy. Stir in graham cracker crumbs and crushed Butterfinger pieces by hand until evenly blended.
Step 2: Shape the Balls
Line a baking sheet with parchment paper. Scoop out 1–1½ tablespoon portions and roll into smooth, firm balls (about 1.5 inches each). Place them on the tray. You’ll get around 18–20 balls depending on size.
Step 3: Chill to Firm Up
Freeze for at least 30 minutes (up to 2 hours) to firm the centers and prevent melting during dipping.
Step 4: Melt the Chocolate
In a microwave-safe bowl, melt chocolate chips and coconut oil (if using) in 30-second intervals at 50% power, stirring between each, until smooth and glossy (about 1½–2 minutes total).
Step 5: Dip and Decorate
Using a fork, dip each chilled peanut butter ball into the melted chocolate, turning to coat completely. Let excess chocolate drip off, then place on parchment. While still wet, sprinkle with crushed Butterfinger, sprinkles, or a pinch of sea salt.
Step 6: Set the Chocolate
Let set at room temperature for 10–15 minutes or refrigerate for about 10 minutes until the chocolate is firm.
Step 7: Serve and Store
Transfer the balls to an airtight container. Store in the fridge and serve chilled for the perfect texture.
Pro Tips for Perfect Butterfinger Balls
- Use regular peanut butter: Natural peanut butter can make the dough oily and unstable.
- Always chill before dipping: Cold centers help the chocolate set beautifully.
- Add coconut oil: It helps achieve that professional glossy finish.
- Let them rest overnight: The flavors intensify after 24 hours.
- Freezer-friendly: Wrap tightly and freeze up to 3 months.
Storage Tips
Store in the refrigerator for up to 1 week in an airtight container. For longer storage, freeze up to 3 months. Layer with parchment paper to prevent sticking. Thaw in the fridge before serving.
Ingredient Substitutions
- Butterfinger bars: Substitute with chopped Heath bars, Skor bits, or Snickers.
- Graham cracker crumbs: Use digestive biscuits, crushed Oreos (without filling), or gluten-free cookies.
- Chocolate coating: Swap semi-sweet for milk, dark, or white chocolate for variety.
- Peanut butter: Replace with almond or sunflower seed butter for allergy-friendly options.
- Coconut oil: Use avocado or neutral oil for less coconut flavor.
Serving Suggestions
Serve these no-bake Butterfinger Balls on a festive dessert platter alongside other holiday favorites. They’re perfect for cookie swaps, holiday buffets, or as charming edible gifts. Package in small boxes or clear bags tied with ribbons for easy gifting. Pair with hot cocoa, coffee, or eggnog for the ultimate sweet treat experience.
Variations
- Add crunch: Mix in chopped peanuts or pretzel bits.
- Vegan option: Use plant-based butter, dairy-free chocolate, and vegan cookies.
- Holiday twist: Top with crushed peppermint or colored sprinkles for Christmas flair.
- Salted caramel upgrade: Drizzle with caramel and sprinkle sea salt before the chocolate sets.
Frequently Asked Questions
Q: Can I use Nutella instead of peanut butter?
A: Not recommended. Nutella is too thin and sweet, which affects the texture.
Q: Why did my chocolate crack?
A: Likely due to temperature shock. Let the balls sit at room temp for 5 minutes before dipping.
Q: Are these gluten-free?
A: Yes, if using gluten-free graham crackers and verifying candy ingredients.
Q: Can I make them vegan?
A: Absolutely! Swap in dairy-free chocolate and plant-based butter.
Q: Can I air fry them?
A: No—these are strictly no-bake. However, you can warm them briefly in the microwave for a soft center.
Nutrition Facts (Per Ball – Approximate)
Calories: 160
Fat: 11g
Saturated Fat: 6g
Carbohydrates: 14g
Fiber: 1g
Sugar: 10g
Protein: 3g
Sodium: 90mg
Conclusion
These Butterfinger Balls are proof that simple ingredients can create extraordinary results. With their creamy peanut butter filling, crunchy candy bits, and smooth chocolate shell, every bite delivers nostalgic candy-bar flavor with homemade charm. Perfect for the holidays, special occasions, or any moment that calls for sweetness, these treats are easy to make, freezer-friendly, and guaranteed to impress. Ready to unwrap happiness? Start rolling—because dessert magic begins right here.