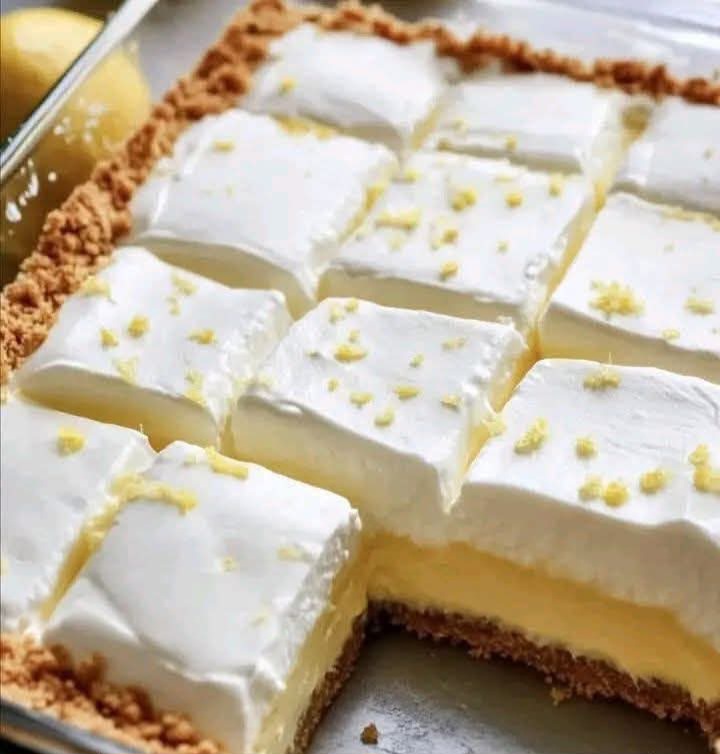
These look absolutely divine—like a cloud of sunshine. This specific style is often called Lemon Icebox Bars or No-Bake Lemon Lush. It features a thick, buttery graham cracker crust, a silky lemon cream filling, and a pillowy whipped topping.
Since it’s a “no-bake” (or nearly no-bake) style, it’s remarkably refreshing for warm weather.
Introduction
When life gives you lemons, skip the lemonade and make these creamy lemon squares. This dessert is the perfect marriage of a crunchy, salty-sweet crust and a tart, velvety citrus center. It’s light enough for a summer BBQ but decadent enough to be the star of a holiday spread. Best of all? It’s incredibly forgiving and requires very little actual “cooking.”
Meta Description
Make the ultimate Creamy Lemon Squares with this easy, no-fail recipe. Featuring a buttery graham cracker crust and a silky lemon cream filling, it’s the perfect refreshing dessert.
Ingredients
For the Crust:
- 2 cups graham cracker crumbs (about 12–14 full sheets)
- 1/2 cup salted butter, melted
- 1/4 cup granulated sugar
For the Lemon Layer: - 2 blocks (16 oz total) cream cheese, softened to room temperature
- 1 can (14 oz) sweetened condensed milk
- 1/2 cup fresh lemon juice (approx. 3 large lemons)
- 1 tablespoon lemon zest
- 1 teaspoon vanilla extract
For the Topping: - 2 cups heavy whipping cream (chilled) or 1 tub (8 oz) whipped topping
- 1/4 cup powdered sugar (if using heavy cream)
- Extra lemon zest for garnish
Instructions (Step-by-Step)
- Prepare the Crust: Mix graham cracker crumbs, melted butter, and sugar in a bowl until it feels like wet sand. Press the mixture firmly into the bottom of a 9×9 or 13×9 inch baking dish.
- Pro Tip: Bake the crust at 175°C (350°F) for 8 minutes and let it cool completely for a crunchier base, or just freeze it for 20 minutes for a true no-bake version.
- Cream the Base: In a large bowl, beat the softened cream cheese until smooth and lump-free.
- Mix the Filling: Gradually pour in the sweetened condensed milk while beating. Add the lemon juice, lemon zest, and vanilla. Continue mixing until the filling is thick and glossy.
- Layer It Up: Pour the lemon mixture over the prepared crust and spread it evenly with a spatula.
- Prepare the Topping: In a separate chilled bowl, whip the heavy cream and powdered sugar until stiff peaks form. Spread this cloud-like layer over the lemon filling.
- The Big Chill: This is the most important step! Cover and refrigerate for at least 4 to 6 hours (overnight is even better) to let the layers set into that perfect “melt-in-your-mouth” texture.
- Garnish and Serve: Just before serving, sprinkle with fresh lemon zest or extra graham cracker crumbs. Use a sharp, wet knife to cut into clean squares.
Service Suggestions
- Berries: Serve with a side of fresh raspberries or blueberries; the tartness of the berries complements the lemon perfectly.
- Mint: A tiny sprig of fresh mint on each square adds a professional, gourmet touch.
- Beverage: Pairs beautifully with an iced Earl Grey tea or a crisp glass of Prosecco.
Storage Tips
- Fridge: Keep covered in the refrigerator for up to 5 days.
- Freezer: These actually make a great “frozen treat.” Freeze for up to 1 month. Thaw for 15 minutes before serving for a semi-frozen, ice-cream-like consistency.
FAQs
Can I use bottled lemon juice?
You can, but fresh lemon juice provides a much brighter, cleaner flavor that makes this dessert stand out.
My filling is too runny, what happened?
The cream cheese must be full-fat and the mixture must chill for several hours. If it’s still runny, ensure you didn’t over-beat the lemon juice into the cheese.
Can I use a different crust?
Absolutely. Golden Oreos or shortbread cookies make a fantastic alternative to graham crackers.
Conclusion
These Creamy Lemon Squares are the ultimate crowd-pleaser. They strike that elusive balance between rich and refreshing, making it impossible to stop at just one square. Simple to assemble and stunning to look at, it’s a recipe you’ll be asked for again and again. Enjoy!