This colorful homemade pickle mix is the perfect way to preserve summer’s crunch. Unlike traditional fermented pickles, these are “quick pickles” (or refrigerator pickles), meaning they stay incredibly crisp, bright, and tangy without the need for complex canning equipment. They are a powerhouse of flavor that adds a refreshing zing to any meal.
Meta Description: Master the art of homemade pickled vegetables with this easy, crunchy recipe. Perfect for preserving cucumbers, carrots, and onions in a tangy vinegar brine!
Ingredients
The Vegetable Medley:
- 2 Large Cucumbers: Sliced into thin rounds.
- 3 Medium Carrots: Peeled and sliced into coins or ribbons.
- 1 Small Cabbage: Thinly shredded (green or white).
- 1 Large Red Onion: Thinly sliced into half-moons.
- Optional: Fresh dill, garlic cloves, or red chili flakes for heat.
The Pickling Brine: - 2 cups White Vinegar (or Apple Cider Vinegar for a fruitier taste)
- 2 cups Water
- 1/4 cup Granulated Sugar (adjust based on sweetness preference)
- 2 tbsp Sea Salt or Kosher salt (non-iodized is best for clarity)
Instructions (Step-by-Step)
- Prepare the Jars: Wash your glass jars and lids thoroughly with hot, soapy water. Ensure they are completely dry before starting.
- Prep the Veggies: Slice all your vegetables consistently. Thinner slices will pickle faster and absorb more flavor, while thicker slices will stay crunchier.
- Pack the Jars: Toss the cabbage, carrots, onions, and cucumbers together in a large bowl to mix. Pack the mixture tightly into the jars, leaving about 1/2 inch of headspace at the top. If you’re using garlic or dill, tuck them into the sides of the jars now.
- Make the Brine: In a medium saucepan, combine the vinegar, water, sugar, and salt. Bring to a simmer over medium-high heat, stirring until the sugar and salt are completely dissolved.
- Pour & Seal: Carefully pour the hot brine over the vegetables until they are fully submerged. Tap the jars gently on the counter to release any trapped air bubbles.
- Cool & Chill: Let the jars sit on the counter until they reach room temperature. Seal tightly with lids and place them in the refrigerator.
Service Suggestions
- The Ultimate Topping: Pile these high on pulled pork sandwiches, burgers, or tacos.
- Side Salad: Serve a small bowl alongside grilled chicken or fish as a palate cleanser.
- Charcuterie Board: Use them to add acidity and color to a cheese and meat platter.
- Rice Bowls: Perfect for adding texture to Poke bowls or Buddha bowls.
Storage Tips
- Refrigeration: These must be stored in the fridge. They are usually ready to eat after 24 hours, but the flavor peaks around day 3.
- Shelf Life: Because this is a refrigerator recipe (not shelf-stable canning), they will stay fresh and crunchy for up to 3–4 weeks.
- Pro Tip: Always use a clean fork to remove vegetables from the jar to prevent bacteria from shortening the shelf life.
FAQs
Can I reuse the brine?
While you can reuse it once for a quick snack, the brine becomes diluted by the water in the vegetables. For the best crunch and safety, it’s better to make a fresh batch.
Why is my brine cloudy?
This usually happens if you use table salt with anti-caking agents. Using pure sea salt or pickling salt keeps the liquid crystal clear.
Do I have to add sugar?
The sugar balances the harshness of the vinegar. You can reduce it, but removing it entirely will make the pickles very sharp.
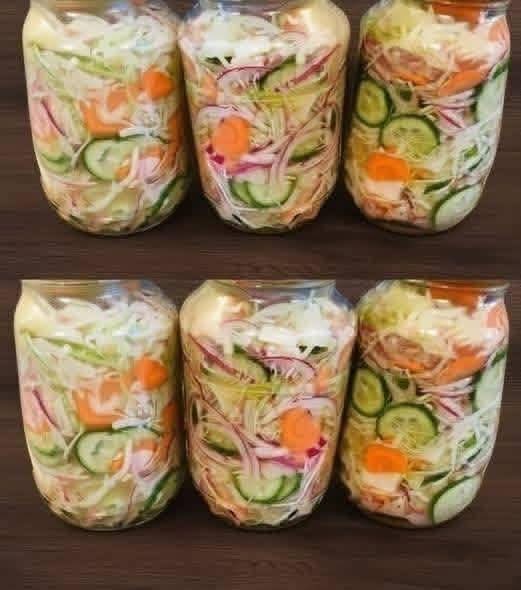
Conclusion
Making your own Homemade Pickled Vegetables is a rewarding, low-effort way to brighten up your kitchen and your diet. With their beautiful layers of green, orange, and purple, these jars are as much a feast for the eyes as they are for the taste buds. Once you try the crunch of a homemade quick pickle, the store-bought versions just won’t compare!