This guide will walk you through the process of creating a stunning whipped cream cake. We’ll start with a fluffy sponge cake base, move on to making the perfect stabilized whipped cream, and finish with professional-looking rosette decorations.
Meta Description: Learn how to bake a fluffy sponge cake and decorate it with professional whipped cream rosettes. This comprehensive guide covers everything from batter to the final masterpiece.
Ingredients
For the Vanilla Sponge Cake:
- 4 large eggs, at room temperature
- 1 cup (200g) granulated sugar
- 1 cup (125g) all-purpose flour
- 1 tsp baking powder
- 1/4 tsp salt
- 1 tsp vanilla extract
- 2 tbsp melted butter (cooled)
For the Stabilized Whipped Cream:
- 3 cups (720ml) heavy whipping cream, very cold
- 1/2 cup (60g) powdered sugar
- 1 tsp vanilla extract
- Stabilizer: 1 tsp unflavored gelatin dissolved in 1 tbsp cold water (melted) OR 2 tbsp instant vanilla pudding mix
Instructions
Step 1: Bake the Sponge Cake
- Prep: Preheat your oven to 175°C. Grease and line two 8-inch cake pans with parchment paper.
- Whisk Eggs & Sugar: In a large bowl, beat eggs and sugar on high speed for about 5–8 minutes until the mixture is thick, pale, and leaves a “ribbon” trail when the whisk is lifted.
- Dry Ingredients: Sift the flour, baking powder, and salt. Gently fold this into the egg mixture using a spatula—do not overmix or you’ll lose the air!
- Final Additions: Fold in the vanilla and melted butter.
- Bake: Divide the batter evenly. Bake for 25–30 minutes or until a toothpick comes out clean. Let them cool completely before frosting.
Step 2: Prepare the Stabilized Whipped Cream
- Chill: Place your mixing bowl and whisk attachment in the freezer for 10 minutes.
- Bloom Gelatin (if using): Mix gelatin with water, let it sit for 5 minutes, then microwave for 10 seconds until liquid. Let it cool slightly (don’t let it set).
- Whip: Pour the cold cream into the chilled bowl. Beat on medium-high until it begins to thicken.
- Sweeten: Add powdered sugar and vanilla.
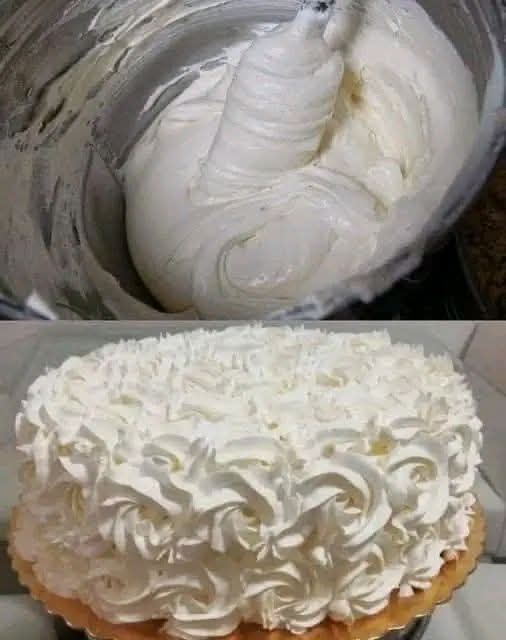
- Stabilize: While beating, slowly pour in the liquid gelatin (or add the pudding mix). Continue beating until stiff peaks form.
Step 3: Assemble and Decorate
- Layering: Place one cake layer on a stand. Spread a generous layer of whipped cream. Top with the second cake layer.
- Crumb Coat: Apply a thin layer of cream over the entire cake to seal in crumbs. Chill for 20 minutes.
- The Rosettes: * Fit a piping bag with a Star Tip (like Wilton 1M or 2D).
- Start from the bottom of the cake. To make a rosette, pipe a small star, then move the tip in a circular motion around that center point.
- Continue until the sides and top are completely covered in swirling rosettes.
Service Suggestions
- Fresh Fruit: Serve with a side of fresh strawberries, raspberries, or blueberries to cut through the richness of the cream.
- Zest: Grate a little lemon or lime zest over the top for a bright, citrusy aroma.
- Tea Pairing: This light, airy cake pairs beautifully with Earl Grey or chamomile tea.
Storage Tips
- Refrigeration: Because of the dairy, this cake must be kept in the fridge. It will stay fresh for 2–3 days.
- Covering: Use a cake dome or a tall airtight container so the whipped cream doesn’t absorb fridge odors.
- Freezing: It is not recommended to freeze a fully decorated whipped cream cake, as the texture of the cream can become grainy upon thawing.
FAQs
Q: Why did my whipped cream turn into butter?
A: You over-whipped it! Once you reach stiff peaks (where the cream stands straight up when you lift the whisk), stop immediately.
Q: Can I use granulated sugar instead of powdered sugar?
A: It’s best to use powdered sugar. It contains a bit of cornstarch which helps with stability, and it dissolves much faster, ensuring a smooth texture.
Q: My cake is dry. What happened?
A: Sponge cakes rely on air. If you mixed the flour in too vigorously, you deflated the bubbles. Also, ensure you don’t over-bake; check it 5 minutes before the timer goes off.
Conclusion
Mastering a whipped cream cake is all about temperature and patience. By using chilled tools and a stabilizer, you ensure those beautiful rosettes hold their shape from the kitchen to the table. Whether it’s for a birthday or a Sunday treat, this airy masterpiece is sure to impress!